Bulk Uploads — Process Multiple PDFs at Once with ProPDF
One file at a time works fine when you're extracting a single document. But what happens when you have ten, fifteen, or twenty PDFs that all need processing? Opening each one individually, uploading, waiting, downloading, and repeating gets old fast. That's why ProPDF built Bulk Upload — a batch processing mode that handles up to 20 files in a single submission.
In this guide, we'll walk through how Bulk Upload works, when to use it, and why it can save you both time and money compared to processing files one by one.
What Is Bulk Upload?
Bulk Upload is a ProPDF feature that lets you select and upload multiple files — up to 20 — in a single batch. Instead of running the extraction pipeline once per upload session, you queue up all your files, upload them together, and ProPDF processes them as a group called a batch.
Each file within the batch is processed independently using the same AI-powered OCR engine that powers ProPDF's single-file mode. The results are saved to your account, and you can access them all from a single batch detail page.
- Up to 20 files per batch
- 10 MB per file — same as single upload
- All major formats supported — PDF, PNG, JPG, JPEG, BMP, TIFF
- Independent processing — each file runs through the full OCR pipeline separately
- Batch payment — pay for the entire batch in one transaction
- Batch tracking — all files appear as a group in your My Files section
Who Can Use Bulk Upload?
Bulk Upload is available to logged-in users only. If you've created a ProPDF account and are signed in, you'll see the Bulk Upload tab right next to Single Upload on the main page. Not signed in? You'll only see the standard single-file upload option.
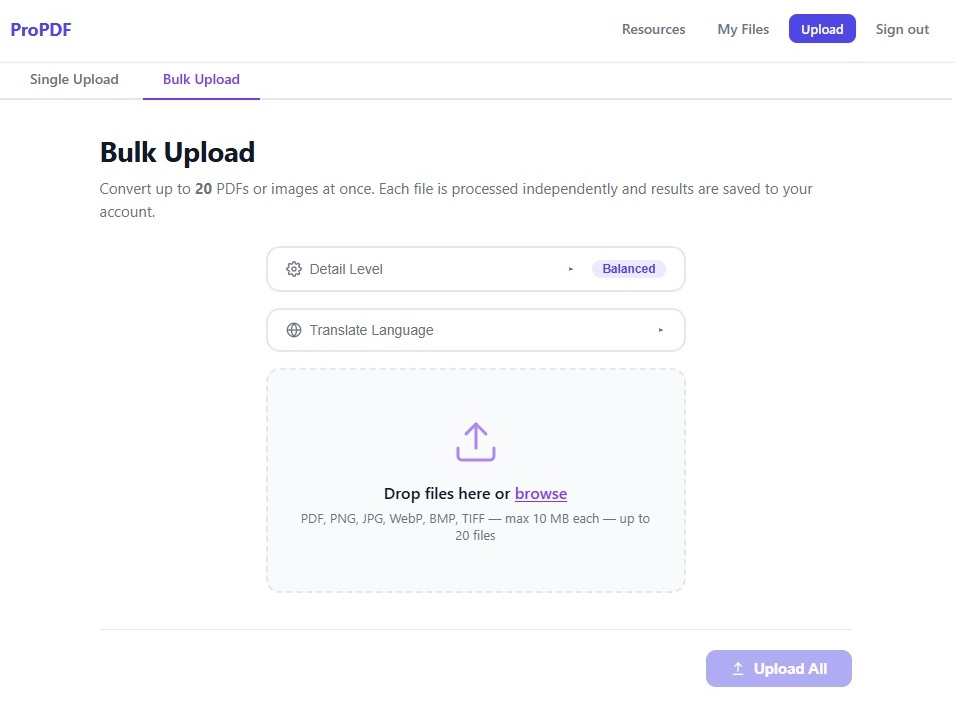
The Bulk Upload screen with Advanced Options.
Don't have an account yet? Signing up takes seconds and unlocks Bulk Upload along with file history, re-processing, and other account-only features.
How to Use Bulk Upload — Step by Step
Step 1: Navigate to Bulk Upload
After signing in, click the Bulk Upload tab located under the top banner navigation on the homepage. This switches the upload interface from single-file to batch mode.
Step 2: Select Your Files
Drag and drop multiple files onto the upload zone, or click to browse and select multiple files from your file picker. You can mix formats — PDFs, images, scanned documents — all in the same batch.
As you add files, they appear in a list showing the filename and size for each. You can review the list before starting the upload and remove any files you don't want to include.
Click Upload All when you are read to start the upload and OCR processing.
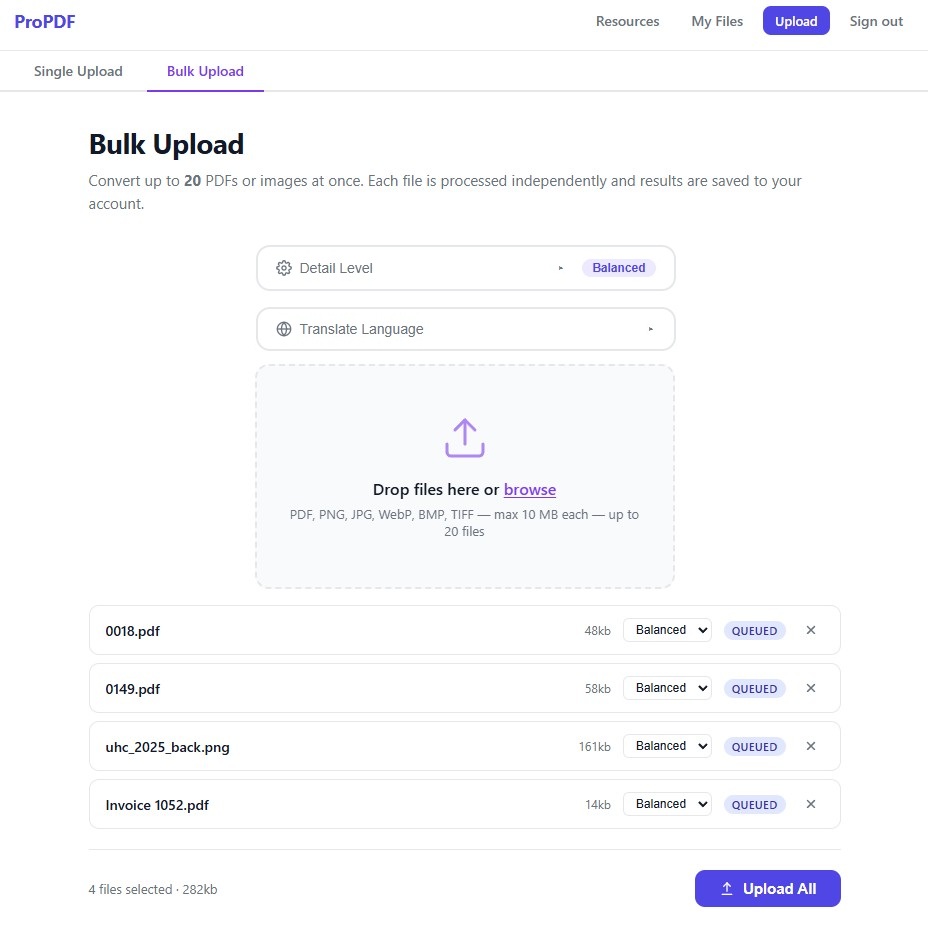
Your selected files will show in this list.
Step 3: Configure Advanced Options
Just like single upload, Bulk Upload supports advanced processing options. Click the Detail Level panel to configure the detail level for the entire batch or the Translate Language to automatically translate your document:
| Detail Level | Best For |
|---|---|
| Low | Simple, text-heavy documents — fastest processing |
| Balanced | Default — speed and quality sweet spot |
| Detailed | Complex layouts, multi-column documents — highest quality, slower |
The detail level you select applies to all files in the batch. You can change the detail level for each files in the upload screen.
Step 4: Upload and Process
Click the Upload button to start the batch. ProPDF uploads all files and begins processing each one independently through the AI OCR pipeline. A progress indicator shows the status of the overall batch as files move through the pipeline.
Processing time depends on the number of files, their complexity, and the selected detail level. A batch of 20 simple text PDFs at Balanced detail will process significantly faster than 20 complex multi-column scanned documents at Detailed level.
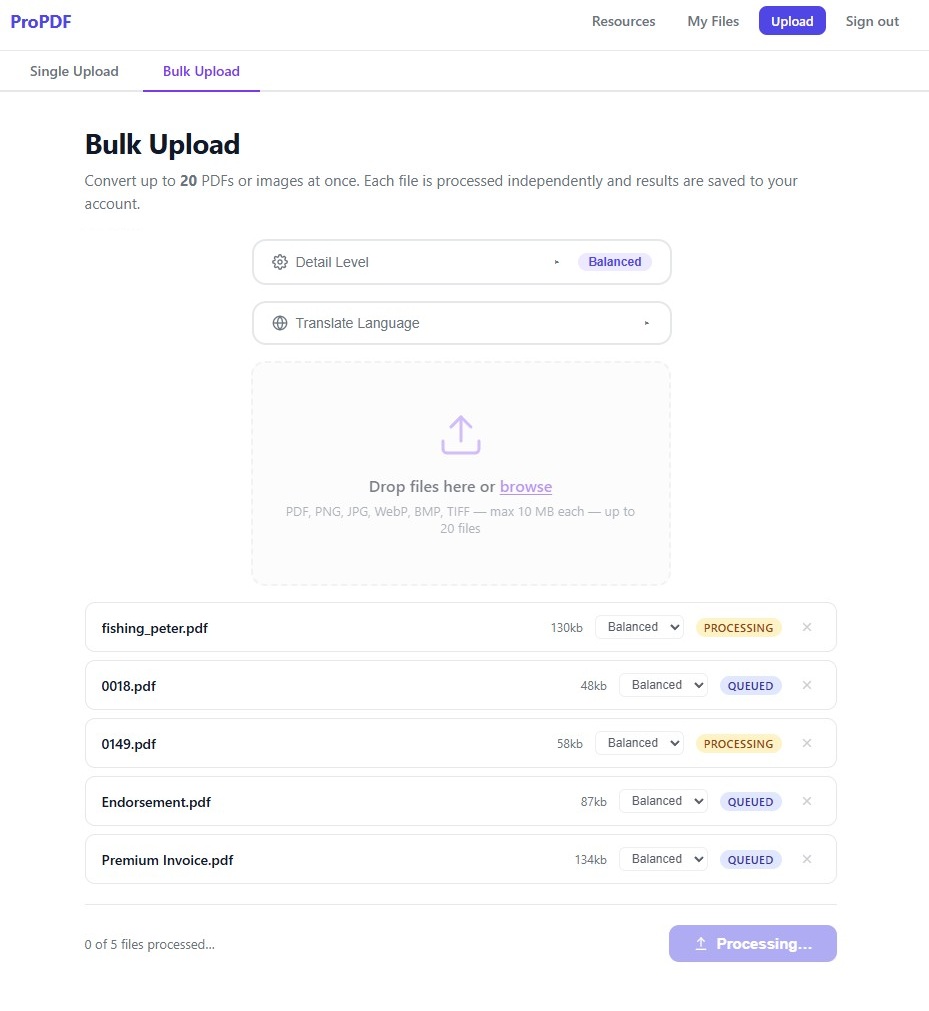
Uploaded files will be automatically processed.
Step 5: Review Results in the Batch Detail Page
Once processing is complete, your batch appears in the My Files section with a distinct batch appearance — different from individual uploads — so you can quickly identify it. Click into the batch to see all child uploads and their results on a single detail page.
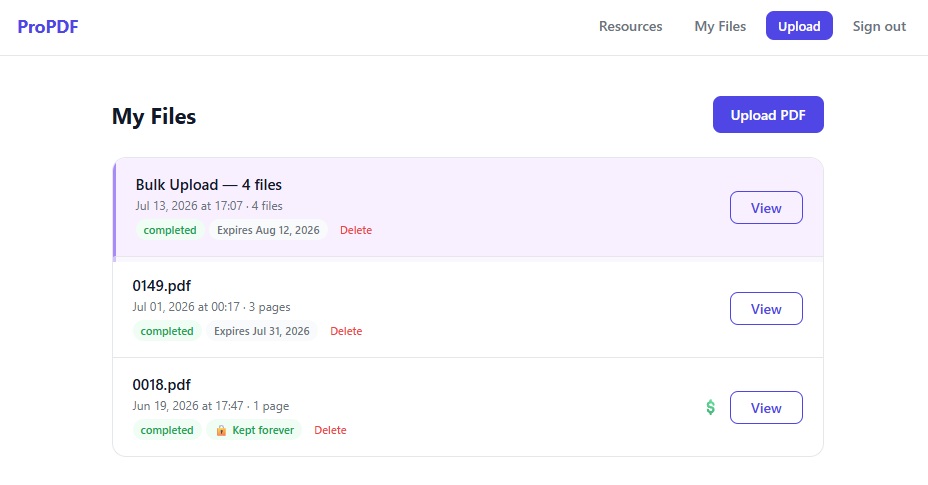
Batch uploads will show up in the My Files section with a distinct color.
The batch detail page shows:
- Batch title — auto-generated as "Bulk Upload — N files"
- Batch status — pending, processing, completed, partial-failure, or failed
- Total page count — sum of all completed child uploads
- Individual file results — each child upload listed with its own status and output
- Payment status — whether the batch has been paid for
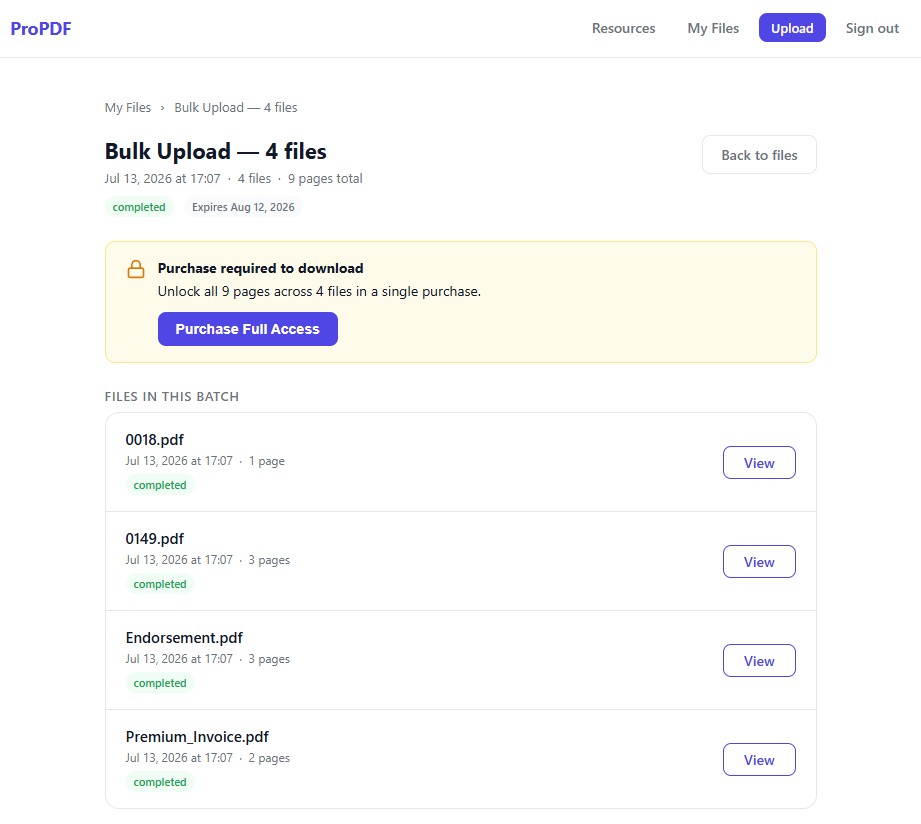
The files you uploaded. You can view them like single uploaded files.
Step 6: Pay for the Batch
Instead of paying per file, you pay for the total pages across all files in the batch at once.
This is where the real savings come in. When you process multiple smaller files as a batch, the per-file overhead is reduced and the total cost reflects the combined page count — often resulting in significant cost savings compared to processing each file individually, especially when your files have fewer pages each.
Step 7: Download Your Results
From the batch detail page, you can access each file's extracted content individually. Download each file in your chosen format — Markdown, plain text, JSON, HTML, DOCX, or CSV — just as you would from a single upload result.
Bulk Upload vs. Single Upload: When to Use Each
| Factor | Single Upload | Bulk Upload |
|---|---|---|
| Files per session | 1 | Up to 20 |
| Account required | No — works anonymously | Yes — must be signed in |
| Payment model | Per file | Per batch (all files in one transaction) |
| Cost efficiency | Standard pricing | Better for multiple small files — savings scale with batch size |
| Processing | One file through the pipeline | Each file processed independently, results grouped |
| Detail level | Configurable per file | One setting for the entire batch |
| File management | Individual entries in My Files | Grouped as a batch in My Files with dedicated detail page |
Use Single Upload When:
- You only have one file to process
- You want to pay per file rather than per batch
Use Bulk Upload When:
- You have multiple documents to process at once
- You're digitizing a folder of receipts, invoices, or contracts
- You're a researcher processing dozens of papers
- You want to save money on multiple smaller files with fewer pages each
- You want all your results grouped together for easy access
- You want a single payment for all files in the batch
Cost Savings: How Batch Pricing Works
One of the biggest advantages of Bulk Upload is the cost structure. Here's how it works:
When you process files individually, each file incurs its own processing cost based on its page count. With Bulk Upload, you pay for the entire batch in one transaction, and the total page count across all files determines the price. This batch-based pricing model means:
- Lower per-file overhead — Transaction and processing overhead is distributed across all files in the batch
- Better for small files — Files with fewer pages (1–3 pages each) benefit the most. The batch pricing reduces the effective per-file cost well below what you'd pay processing them individually
- Transparent pricing — You see the total page count and cost for the entire batch before paying
- One payment — No need to check out 20 times. One payment covers all files
For example, if you have 15 single-page receipts to process, processing them individually would mean 15 separate transactions. With Bulk Upload, you upload all 15, and a single payment covers the combined 15-page batch — with savings that come from the batch pricing model.
File Retention
Batch uploads follow the same retention policy as individual uploads. Completed batches are retained for 30 days. If you need to keep results longer, use the Keep Forever option to prevent automatic deletion.
Real-World Use Cases
Expense Report Digitization
You return from a business trip with 12 receipts photographed on your phone. Upload all 12 images as a batch, process them with Balanced detail, and pay once for the entire batch. The per-receipt cost is significantly lower than processing each one individually.
Legal Document Batch Processing
A law firm receives 15 contracts as scanned PDFs. Rather than uploading them one at a time, use Bulk Upload to queue all 15 in a single batch with Detailed detail level for maximum accuracy. Each contract is processed independently, and results are grouped for easy review.
Research Paper Extraction
A researcher downloads 20 academic papers as PDFs. Upload them as a batch, choose Markdown output, and get structured, searchable text from all 20 papers in one session — all grouped together in My Files.
Invoice Processing
An accounts team receives 8 vendor invoices in PDF format every week. Upload them as a batch, process with Balanced detail, and download the extracted data. One payment covers all 8 invoices, and the results are organized as a single batch in the My Files section.
Frequently Asked Questions
Do I need an account to use Bulk Upload?
Yes. Bulk Upload is only available to signed-in users. If you don't have an account, you can create one in seconds from the ProPDF homepage.
What's the maximum number of files I can upload in one batch?
Up to 20 files per batch. If you have more than 20 files, create multiple batches.
What's the maximum file size?
Each file is limited to 10 MB — the same limit as single upload. There's no separate limit for the total batch size, but each individual file must be under 10 MB.
Can I mix PDFs and images in the same batch?
Absolutely. You can mix PDFs, PNGs, JPGs, TIFFs, and other supported formats in the same batch. Each file is processed independently through the appropriate pipeline.
Can I use different detail levels for different files in the same batch?
Yes. The detail level in Detail Level options sets the initial detail level, but once the files are uploaded you can change the detail level at the individual file level.
How are bulk uploads displayed in My Files?
Bulk uploads appear as a single batch entry with a distinct visual style — different from individual uploads — so you can easily identify them. Clicking the entry takes you to the batch detail page showing all child uploads.
How does payment work for batches?
You pay for the entire batch in a single transaction. The cost is based on the total page count across all files. This often results in savings compared to paying per file individually, especially for batches with multiple small files.
Can I delete a batch upload?
Yes. You can soft-delete a batch from the My Files section. This removes it from your active file list while keeping the data recoverable for a period before permanent deletion.